Commisioning
To be able to do anything useful with the ESPmeter, it needs to be joined to an existing WiFi network. The challenge is to accomplish that considering the device doesn't have a keyboard and screen that can be used to enter the credentials.Note: When the description below mentions "button", it refers to the S1 or S2 button, not the Wemos D1 mini RESET button.
Configure WiFi
 When power is applied to the ESPmeter, the device will attempt to reconnect
to the last WiFi network it was connected to.
If the connection fails, or if the device has never been connected to a WiFi
network, the failure is indicated by a steady blue LED.
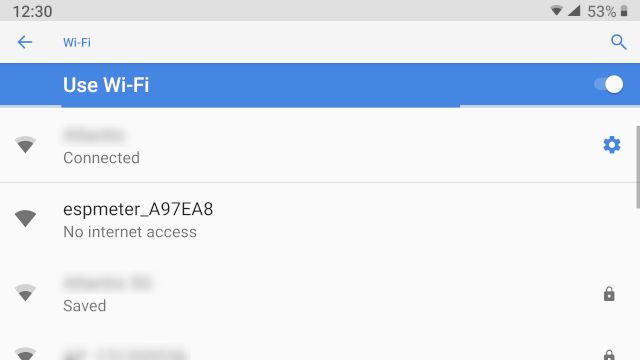
At the same time the ESPmeter activates its own WiFi network. This network
has an SSID of espmeter_XXXXXX, where XXXXXX is a unique hex number for the
device.
When power is applied to the ESPmeter, the device will attempt to reconnect
to the last WiFi network it was connected to.
If the connection fails, or if the device has never been connected to a WiFi
network, the failure is indicated by a steady blue LED.
At the same time the ESPmeter activates its own WiFi network. This network
has an SSID of espmeter_XXXXXX, where XXXXXX is a unique hex number for the
device.
There are two options to connect the device to a WiFi network:
- WPS
- Manually
WPS
If your WiFi Access Point supports this functionality, it will be the easiest way to connect the ESPmeter to the WiFi network. If you are going to use this method, it is still a good idea to scan the available WiFi networks and note down the 6 hexadecimal digits of the espmeter network.First activate WPS on the Access Point. Then briefly press the button of the ESPmeter. The LED starts flashing (2 seconds on, 1 second off). If the WPS procedure fails, the LED will eventually (around 18 seconds) light continuously again. If the WPS connection is successful, the LED will start indicating the reception of messages from the smart meter.
If the ESPmeter is already connected to the smart meter, chances are that the LED will continue to flash when the WPS procedure succeeds. However, the pattern will be different. In case of a DSMR 4 smart meter, the LED will flash once every 10 seconds. With a DSMR 5 smart meter, it will flash once ever second. Especially in the latter case, the change is not very obvious. So pay close attention.
Manually
For this method, some kind of WiFi client will be needed to connect to the espmeter_XXXXXX network and manually configure the WiFi settings. In many cases a smartphone will be used for this. For that reason the device will be referred to as "phone" in this explanation. However, the procedure can just as well be performed using a tablet or laptop PC.
 Initially the phone will be connected to the target WiFi network. The
ESPmeter doesn't have any information about this network, so it is unable to
connect to it. This situation can be recognized by the steady blue LED on the
ESPmeter.
As indicated earlier, the ESPmeter will create its own WiFi network in these
circumstances. Connect the phone to this espmeter_XXXXXX network.
Initially the phone will be connected to the target WiFi network. The
ESPmeter doesn't have any information about this network, so it is unable to
connect to it. This situation can be recognized by the steady blue LED on the
ESPmeter.
As indicated earlier, the ESPmeter will create its own WiFi network in these
circumstances. Connect the phone to this espmeter_XXXXXX network.
Hint: When the device has previously been used on a different WiFi network, it continues its attempts to connect to the configured WiFi network. This may make it difficult for a client device to connect to the espmeter network. A simple trick is to press the button on the ESPmeter, which starts WPS. As there is no Access Point listening for a WPS connection, the attempt will fail. But this action has the side-effect that it stops the ESPmeter from trying to connect to the configured WiFi network. Now connecting with a WiFi client should work much better.
The espmeter_XXXXXX network presents a captive portal that will direct any web access to a fixed web page. This technique is frequently used at public WiFi networks to direct users to a login page. Many devices will detect the captive portal and pop up a "Sign in to network" message. This description is a bit misleading in this situation, because the ESPmeter doesn't require the user to sign in. Choosing the "sign in" option takes the user to the configuration screen of the ESPmeter instead.
If the "sign in" option isn't offered, the configuration screen can also be accessed by going to http://192.168.4.1/ using a browser on the phone. Due to the captive portal, any web page accessed by its FQDN over HTTP (not HTTPS) will redirect to the configuration page.
Smartphones don't always live up to their name. When they detect that the WiFi network has no internet access, they stupidly route any connection attempt via the mobile data network. Obviously, that is not going to do what we want. To prevent this, it is advisable to temporarily switch off the mobile data network.
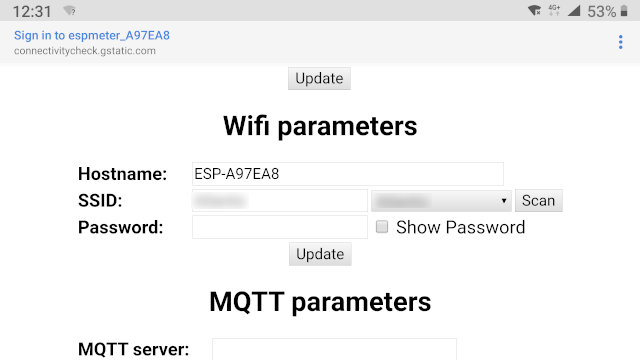 On the configuration page, you can select your WiFi network and enter the
corresponding password (also known as pre-shared key, or PSK). Take note of
the auto-generated hostname, or change it to something more useful, like
"espmeter1". Then click "Update".
On the configuration page, you can select your WiFi network and enter the
corresponding password (also known as pre-shared key, or PSK). Take note of
the auto-generated hostname, or change it to something more useful, like
"espmeter1". Then click "Update".
The ESPmeter will try to connect to the configured WiFi network. If the data was entered correctly, this should succeed within a few seconds. The LED will extinguish or start flashing. The web page will indicate "Connected" and report the IP address of the ESPmeter on the target WiFi network. If the web page keeps indicating "Disconnected" and the LED stays on, the entered information was probably incorrect. Using the "Reconfigure" link, the configuration can be corrected.
The ESPmeter only has a single radio. If the target WiFi network uses a different channel than the ESPmeter_XXXXXX network, the ESPmeter will have to switch channels to connect to the target network. As a result, the channel of the ESPmeter_XXXXXX network also changes. This may interrupt the browser's connection. Due to this, it is possible that the status page may not show the "Connected" indication. But if the LED on the ESPmeter is no longer on, that is still an indication that the connection succeeded.
Once the ESPmeter has successfully connected to the target WiFi network, the phone can also be reconnected to that network. The ESPmeter can then be reached by the reported IP address. See the "web server" section below if no IP address was reported, or this information was otherwise lost.
Baud rate selection
Once the device has a working WiFi connection, the LED lights up with every report it receives from the smart meter. Initally the device listens for reports at 115200 baud. Older smart meters used 9600 baud. If the LED doesn't start to blink periodically (every 1 or 10 seconds), the baud rate may be wrong. Pressing the button will toggle between the two baud rates. When the first report is received successfully, the correct baud rate has been determined. At this point the device enters normal operation.Web server
The device contains a web server that provides a convenient way for the user to view the information reported by the smart meter. To access the web server, the user needs to point their web browser to the IP address the device received from the DHCP server in the local network. However, figuring out what the IP address is can be a bit of a challenge. To assist with that, the ESPmeter supports mDNS. If your web browser also supports mDNS, you can access the device via its hostname in the .local domain. So, if you changed the hostname to espmeter1, you can point your web browser to http://espmeter1.local/. If you used WPS, take the 6 hexadecimal digits of the network that the ESPmeter created, and put "esp-" in front of that. For the device shown in the pictures, the resulting URL would be http://esp-a97ea8.local/. The address is not case sensitive.The actual IP address assigned to the ESPmeter is listed on the 'Systeem details' page. You can use that address to connect to the ESPmeter from devices that don't have mDNS support.
Firmware upgrade
During normal operation, the LED continues to blink for each received report. Pressing the button at this time causes the device to check for availability of firmware updates. If an update is available, the device is upgraded "over the air". During the upgrade, the LED flashes fast (0.2 seconds on, 0.2 seconds off).LED and button
Depending on the situation, the LED and button have different functions. These have been described in detail above. Here is a quick reference:
| LED | Description | Button |
|---|---|---|
| On (Red) | The ESPmeter is not connected to any existing WiFi network and created its own | Start WPS |
| 2s on, 1s off (Red) | Attempting to set up a WPS connection | - |
| 0.2s on, 0.2s off (Red) | OTA upgrade is in progress | - |
| 1s on, 9s off (Green) | The ESPmeter is receiving messages from a DSMR 3/4 smart meter | OTA upgrade |
| 0.2s on, 0.8s off (Green) | The ESPmeter is receiving messages from a DSMR 5+ smart meter | OTA upgrade |
| Off | The ESPmeter is not receiving any messages from the smart meter | Baudrate |